
(Some Spoilers for anyone that has not gotten this far in the game)
An overview of Amps and how they perform when using Madurai, Eternal Eradicate and Eternal Onslaught and some info on where to get these components and my very brief opinion on how they feel to use.
A lot of this post will be aimed more at people who have recently unlocked Operators/never really bothered with Amps. You may still find the brief captura previews helpful if you wanted to see an Prism/Scaffold’s fire-mode though.
Video showing how various Amps perform when buffed. The first Shield Break after a captura preview shows damage with Void Strike while the second Shield break does not use this buff.
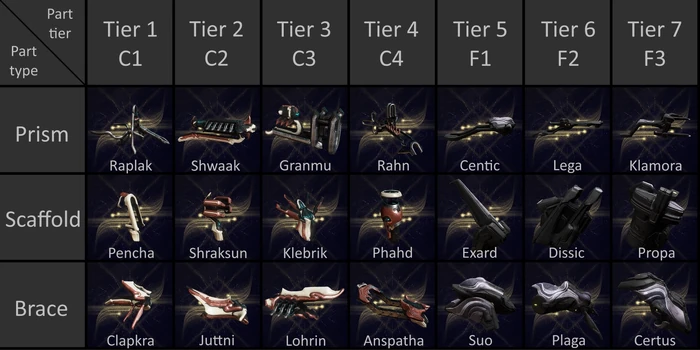
Table of Amp Components
*Numbers represent parts in this order. A 1-2-3 Amp would have the Raplak Prism, Shraksun Scaffold and the Lohrin Brace.
This should only be considered a rough guide for Amp performance for various reasons:
- Overflow damage is hidden (if the boss has 10k shields, 10k is the highest damage number you will see)
- After breaking the first synovia, the Eidolon only recovers 50% of its shield
- Teralyst has ~29k shields, Gantulyst has ~41k shields, Hydrolyst has ~52k shields
What’s boosting my Amp’s damage:
- Void Strike (Madurai’s 1, Only on first shield break after captura previews)
- Contamination Wave (Madurai’s 2, every shield break)
- Volt’s shield boosts Crit Damage as long as the beam/projectile passes through it
- Eternal Eradicate (Zaramin from Thrax/Void Angel or purchased from Cavalero)
- Eternal Onslaught (Zaramin from Thrax/Void Angel or purchased from Cavalero)
For newer players with only a Mote Amp, roam around the Plains of Eidolon at night and hunt for Vomvalysts. Return to Cetus and fast travel to Quill Onkko to trade in the Sentient Cores for standing. You want to replace the Mote Amp with anything else as fast as possible but do not sell the Mote Amp until you have finished Guilding it and finished ranking it back up to 30. Prisms are the only Amp Component that count towards mastery, Scaffold and Braces are ignored.
The easiest place to level an Amp would be Sanctuary/Elite Sanctuary Onslaught, you must be in operator mode for affinity to go to your Amp. Return to Onkko to Guild your Amp and level it back to 30 one more time to get all the mastery from it.
First start with the first Amp you can craft, and continue ranking up your standing with the Quills until you reach rank 3 (Adherent) to unlock Guilding and the Lohrin Brace becomes available which is the best Brace that will be available to you (for the majority of Amps) until you get into ranking up Vox Solaris on Fortuna. In the meantime build an Amp with your favorite Prism + Scaffold + Lohren Brace (x-x-3), and if you have extra Quills standing consider picking up Magus Nourish, Virtuous Strike or Virtuous Shadow.
Find a guide for capturing the first Eidolon that focuses on basics not doing it fast (first you get good then you get fast). The Sentient Cores dropped from the Eidolon are worth more than what come from Vomvalysts, so its worth it to try taking down this Boss for its drops (Arcane Nullifier can be farmed here, and is helpful for anyone starting out Eidolon hunting). Public lobbies usually aren’t too bad for this bounty, and tend to go faster than solo. Eidolon Shards are also one of the possible ways to can rank up your focus schools, the others being killing Thrax on the Zaramin/Duviri or Focus Lenses.
Once you get to Fortuna and rank up Vox Solaris (one of the harder Syndicates to rank up, try farming for Toroids if you have a resource drop booster from Sortie, Special Event, or get a Relay Blessing) you will have access to the Amp components 4-7 on the table linked earlier. The Certus Brace (x-x-7) is generally considered the best brace for most Amps.
Play missions on the Zaramin to farm Eternal Onslaught/Eradicate as well as Amp Arcane Adapters which can be purchased from Cavalero to fit an extra Amp Arcane.
Here is a link to the previous Amp video I made which is closer in line to the damage newer players can expect without the damage boosts from Madurai, Eternal Onslaught, or Eternal Eradicate. If any Prism/Scaffold seems to take an excessively long amount of time to break shields/misses often, you might want to consider using a different Prism/Brace.
If you want to build an amp aimed towards Void Angels, you will want to take into account the range required to hit the Void Angel depending on where it in the Arena as some amps may have issues hitting it depending on where it is in the arena.
For most missions, you probably won’t have any issues killing a Void Angel, but if you’re doing Steel Path/Void Armageddon, you may want to increase your damage a little more to deal with scaling. I’m not sure if this is an oversight but inside the arena, Void Angels have the Flesh health type. This means that you can use Virtuous Trojan to convert some of your amp’s Void Damage into Viral which does 50% damage to Flesh. You can inflict up to 4 stacks of Viral on a Void Angel. *Avoid using a Maxed ranked Virtuous Trojan as you will be reducing the amount of damage that can be done to a Thrax in its spectral form.
Another Arcane that you can use is Magus Melt which will add Heat to your operators attacks on Void Sling. This Arcane does not convert a portion of your Void Damage the way Virtuous Trojan does, so you will not have any issues using a Maxed Ranked Magus Melt. The 4 status cap still applies to this status type.
Notes about Prisms/Scaffolds:
Cetus Prisms
Raplak 1-x-x:
- Semi-Auto with reasonable damage and very accurate
- Long Range
- No Punch Through
Shwaak 2-x-x:
- Arca plasmor like projectile with infinite body punch through and able to hit multiple limbs
- Medium Range, able to reach Void Angel in center of arena
- Infinite Body Punch Through
Granmu 3-x-x:
- A three round burst of grenades with a small explosion which will detonate on contact or after a certain amount of time
- Medium-Long Range but aiming may be difficult due to arc and travel speed
- No Punch Through
Rahn 4-x-x:
- Fully automatic projectiles with reasonable damage
- Long Range and Good Accuracy
- No Punch Through
Fortuna Prisms
Centric 5-x-x:
- Three round burst fire mode
- Projectiles are similar to Rahn Prism’s
- No Punch Through
- Medium Long Range and Good Accuracy
Lega 6-x-x:
- Flamethrower with very slow tick rate. Not very fast for taking down Eidolon Shields
- Good Status Chance making it easier to proc Void Status compared to other Amps
- If built around procing Void Status, it pairs well with Phahd Scaffold (x-4-x) to trap Glaive projectile around enemies and Lohrin Brace for higher base Status Chance (x-x-4)
- Infinite Body Punch Through
- Medium Range, able to hit Void Angel on the perimeter
Klamora 7-x-x:
- A wide beam with low range. Quickly drains ammo but does a lot of damage to shields in a short amount of time.
- Not a great Amp for Ropalolyst fight, but great for Eidolons
- Infinite Body Punch Through
- Short Range, still able to hit Void Angel if it is in the center of the arena and does decent damage to it, but not enough range if it teleports to the perimeter
Cetus Scaffolds
Pencha x-1-x:
- Opticore like beam with reasonable damage
- Long Range (40m) and Accurate
- No Punch Through
Shraksun x-2-x:
- Arca plasmor like projectile with infinite body punch through and able to hit multiple limbs
- Medium Short range Prism, can’t reach Void Angel in center of arena but not on the perimeter
- Projectile is similar to Shwaak Prism’s
- Infinite Body Punch Through and Detonates at end of Projectile lifespan or on collision with Terrain. Able to Self-Stagger if detonated on terrain.
Klebrik x-3-x:
- Tethers to single enemy, low damage and does not always latch onto the enemy you want it to
- No Punch Through
- Medium Range, is able to hit Void Angel on perimeter
Phahd x-4-x:
- Bouncing Glaive projectile with decent damage and some homing capabilities, similar to the Cedo’s Alt-Fire
- Easier to use up close because of projectile’s travel time
- Works well for dealing with tanky enemies if you are able to proc Void Status on them first to trap the projectile. You will notice a faint green orb around an enemy if it has Void Status applied to it, or in the case of an Eidolon, the orb can spawn around a limb that was hit by your Amp. 6-4-3 is what I would probably use for priming, the primary fire has good status chance and ammo efficiency, while the Lohren Brace boosts both Crit Chance and Status chance.
- Long Range
Fortuna Scaffolds
Exard x-5-x:
- A very high recoil, low accuracy fire mode that mag dumps
- No Punch Through
- Long Range but unable to make good use of it due to low accuracy
Dissic x-6-x:
- Slow grenade projectile which detonates on contact, consumes 50 ammo per shot
- Low Damage Bomblets after initial explosion
Propa x-7-x:
- A sphere that does high damage when it collapses, easy to self-stagger.
- Very low range, not suitable for Ropalolyst and unable to reach Void Angels in center of arena
Mote Amp:
- Very low damage and long recharge, you will probably hate using this Amp
- Medium Range (30m)
- Constant Beam fire mode and no Alt-Fire
- No Punch Through
Sirocco:
- Semi-Auto pistol with a perfect reload gimmick, no Alt-Fire
- Better than the Mote amp but still not great for sustained damage
- Long Range and good Accuracy
- Considered a different weapon from the one used on Duviri, Arcanes will not carry over
- No Punch Through
Last Gasp/Killing Regular Enemies
The Focus School which works best for this is probably Unairu, thanks to its ability to spawn Wisps which double your Amp’s Damage, and its Abilities which fully strip Armor and Shields.
Madurai comes in second for making use of Last Gasp/Killing Regular Enemies. While it has higher peak damage than Unairu thanks to Void Strike, it only has this buff for 8s followed by a 40s cooldown. Madurai also has the Contamination Wave ability which makes enemies hit by it take 50% more vulnerable to Void Damage. At higher levels Madurai starts to fall off due to Scaling Armor/Shields.
Naramin’s Void Levitation + Lethal Levitation is similar to Madurai’s Contamination Wave, boosting damage for each lifted enemy (+50% each stack) up to 4 stacks. The enemy must be damaged while lifted to grant a stack. Enemies with Overguard cannot be lifted.
Zenurik/Vazarin don’t really have any abilities that make it easier to kill an enemy with an Amp.
Arcanes like Magus Melt and Virtuous Trojan will make it easier to kill enemies with an Amp, and Debuffs like Banshee’s Sonar also work to boost Amp Damage.
*Virtuous Troja converts a portion of Void Damage to Viral, this means you will do less damage to anything that requires Void Damage to be damaged.
Great guide!